Feb 26, 2009
Stop Error 0x0000007E After SP3 is installed
to navigate to the correct spot.
HKEY_LOCAL_MACHINE
SYSTEM
CurrentControlSet
Services
Intelppm 4) In the right hand column find the entry titled START and double-click on it5) Change the number to 4 and click Ok6) Close the Registry Editor7) Shut down your computer and restartThis time the computer should restart normally and finish the installation of SP3.
Feb 24, 2009
Remove Windows Genuine Notification
Lauch Windows Task Manager.
End wgatray.exe process in Task Manager.
Restart Windows XP in Safe Mode.
Delete WgaTray.exe from c:\Windows\System32.
Delete WgaTray.exe from c:\Windows\System32\dllcache.
Lauch RegEdit.
Browse to the following location:HKEY_LOCAL_MACHINE\SOFTWARE\Microsoft\Windows NT\CurrentVersion\Winlogon\Notify
Delete the folder ‘WgaLogon’ and all its contents
Reboot Windows XP.
Note: With this method, you may be prompted to install WGA Notifications again which can still be unselected.
Second Method
Another alternative suggested by dman is by using System Restore to restore the PC to a previous restore point that WGA Notifications hasn’t kicked in, and then carefully stop KB905474 from been applied to the system. To use System Restore, go to Start -> All Programs -> Accessories -> System Tools -> System Restore.
Note: Again, you may be prompted again to install WGA Notification, so it must be bypassed.
Third Method
This method involves using a cracked version of LegitCheckControl.dll to replace the original copy of LegitCheckControl.dll, and thus bypass the WGA validation and make Microsoft believes that your copy of Windows is genuine. To get rid of WGA Notifications warning messages, the patched version of WgaLogon.dll and WgaTray.exe to replace the existing files.
To apply the patch by replacing the files manually, try to end the respective processes in the Task Manager before deleting the existing files. Most likely is you will have to restart your PC in Safe Mode in order to replacing the original copy of LegitCheckControl.dll and related files. However, there has been automatic updater and even cracked WGA installer that automatically apply the patched version of WGA files.
Feb 22, 2009
ഫ്രീ വിസ
Feb 20, 2009
VPN Connection
Slow Windows PC
Computer running Windows isn’t running in the same speed that it used to run when you first used it. It’s slower, crappy, takes a while to start and tests your patience like anything. There are many reasons for this, let’s try fixing up a few things on your slow Windows PC:
Slow Start Up
There can be a variety of reasons to Windows loading slow during start up. Go to Run, type msconfig and hit enter. Under the ‘Start Up’ tab, uncheck the unwanted programs and press OK. Things should be a bit fine the next time Windows boots.
Another program worth mentioning here is StartUp Delayer which will help in setting after how much time programs should be loaded after Windows boots. For instance, you could set your instant messenger program to load 50 seconds after Windows starts up.
Slow Loading Start Menu
If the Start Menu items are loading slowly, you can open the Registry Editor by typing in the Run menu ‘regedit.exe’ and pressing Enter. Go to HKEY_CURRENT_USER\Control Panel\Desktop. Look for MenuShowDelay, and double click to edit the value. The lower the number specified, the faster the Start Menu will load.
Slow Right Click Context Menu
Probably the Windows Right Click menu on your computer is loading slow because too many programs added unwanted entries there. Just download this program called Mmm, install it and then modify your context menu to remove unwanted items to speed it up.
Slow Send To Menu
If the Send To menu loads slowly, you can type ’sendto’ in the Run Dialog, and remove unwanted items in the Explorer Window that appears. This should add some speed to it.
Slow Defragmentation
The Windows Defragmenter can’t get any slower. You need to have an alternative to the Windows Defragmenter, and Defraggler is just one of the best ones available in the market. It’s free, and works like a charm and can speed up defragmentation manifold. For some alternatives, see Five Free Programs to Defragment your PC.
Slow loading My Computer
WindowIf the My Computer Window loads slowly, in the Explorer Window, go to Tools >> Folder Options >> View and uncheck ‘Automatically search for network folders and printers”
Slow loading Add or Remove Programs
AppletThis is one of the most annoying piece of programs present in Windows, it takes ages to load if you have a considerable number of programs installed on your computer. You can either use the all-in-one CCleaner for this purpose, or get MyUninstaller that comes as a speedy replacement for Add or Remove Programs.
Slow Ending of Unresponsive Programs
If you’ve clicked on ‘End Task’ if any program is running unresponsive, you might have noticed that the program is not terminated immediately. You can alter this by going to Run >> regedit.exe >> HKEY_LOCAL_MACHINE\System\CurrentControlSet\Control\ and change this value to 1000.
Disable Animations and Appearance Overhauls to maximize performanceIf you’re a serious performance junkie, you probably won’t bother about eyecandy. Go to System Properties in the Control Panel. Click ‘Advanced’, then ‘Performance’ and click ‘Adjust for best performance’. This might boost your PC’s performance up a bit.
Then check the status of your Antivrus and Memmory(Increasing memory will help u a lot)
SVCHOST.exe Error
Right click My Computer
Click Properties
Click the Automatic Updates tab
Choose Turn off Automatic Updates
Restart your computer
Connect to the internet
Click Start >> All Programs >> Windows UpdateManually
windowsTurn On Automatic Updates again
If not come back to me, i will give you one another solution... actually The SVCHOST.exe Application error is thrown because of a corrupted Windows Update in Windows XP.Infact, the only options that the error message allows are to click OK to terminate the program or click Cancel to debug the program...........
also you can try with good registry cleaner....http://www.download.com/CCleaner/3000-2144_4-10315544.html
the svchost.exe applications in the Registry of your Windows operating system relate to what Microsoft refer to as a "Service Host".
if not use this way
Verify Windows Update Service SettingsClick on Start, Run and type the following command in the open box and click OKservices.mscFind the Automatic Updates service and double-click on it. Click on the Log On Tab and make sure the "Local System Account" is selected as the logon account and the box for "allow service to interact with desktop" is UNCHECKED. Under the Hardware Profile section in the Log On Tab, make sure the service is enabled. On the General Tab, the Startup Type should be Automatic, if not, drop the box down and select Automatic. Under "Service Status" on the General tab, the service should be Started, click the Start button enable it. Repeat the steps above for the service "Background Intelligent Transfer Service (BITS)"
Re-Register Windows Update DLLs
Click on Start, Run, and type CMD and click ok In the black command window type the following command and press Enter
REGSVR32 WUAPI.DLL
Wait until you receive the "DllRegisterServer in WUAPI.DLL succeeded" message and click OK Repeat the last two steps above for each of the following commands:
REGSVR32 WUAUENG.DLL
REGSVR32 WUAUENG1.DLL
REGSVR32 ATL.DLL
REGSVR32 WUCLTUI.DLL
REGSVR32 WUPS.DLL
REGSVR32 WUPS2.DLL
REGSVR32 WUWEB.DLL
Remove Corrupted Windows Update Files
At the command prompt, type the following command and press Enter
net stop WuAuServStill
at the command prompt, type
cd %windir%
and press EnterIn the opened folder, type the following command and press Enter to rename the SoftwareDistribution Folder
ren SoftwareDistribution SD_OLD
Restart the Windows Update Service by typing the following at the command
promptnet start WuAuServ
type Exit and Press Enter to close the command prompt
Reboot Windowsclick on Start, Shut Down, and Restart to reboot Windows XP
Although this method may not solve all of the issues with a SVCHOST.EXE Application error, I have found it fixed the problem with the 0x745f2780 reference error.
Other Issues with SVCHOST.EXE
1) Download and install Update for Windows XP (KB927891)
2) Download and install an update for Windows Update Agent WSUS 3.0
3) Restart your computer and your computer should run better with slowing to a crawl because of SVCHOST.EXE
Third Way
use the following command to show all svchost.exe associated services or libraries and instances:
tasklist /svc /fi "imagename eq svchost.exe"
normally you can get five svhost.exe.....if there is any thing more ...like capital letter SVHOST.EXE..then that is a Virus ...
So you want to use a good VIrus REmover .....
use.....smart remover http://www.technize.com/?dl_id=6
and install avira antivirus http://www.download.com/Avira-AntiVir-Personal-Free-Antivirus/3000-2239_4-10322935.html?part=dl-10322935&subj=dl&tag=button&cdlPid=10986298
Here is another quick tip on keyboard shortcuts
here is one bestway to open My Computer
Use This way,
logo+R (means run) then inside the command box
Put one dot (.) then you can open your C:\Documents and Settings\user
the command box two dot(..) you can open your C:\Documents and Settings
three dots (...)you can open your My Computer
all dots without bracket
Like
.
..
...
try and inform me how its...I think nobody know about this shortcuts....Enjoy
Windows XP Installation
Windows Vista ReadyBoost
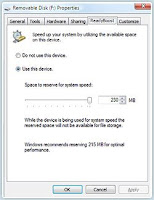 Windows ReadyBoost improves system memory and boosts performance.Adding system memory (typically referred to as RAM) is often the best way to improve a PC's performance, since more memory means more applications are ready to run without accessing the hard drive. However, upgrading memory can be difficult and costly, and some machines have limited memory expansion capabilities, making it impossible to add RAM.Windows Vista introduces Windows ReadyBoost, a new concept in adding memory to a system. You can use non-volatile flash memory, such as that on a universal serial bus (USB) flash drive, to improve performance without having to add additional memory "under the hood."The flash memory device serves as an additional memory cache—that is, memory that the computer can access much more quickly than it can access data on the hard drive. Windows ReadyBoost relies on the intelligent memory management of Windows SuperFetch and can significantly improve system responsiveness.It's easy to use Windows ReadyBoost. When a removable memory device such as a USB flash drive or a secure digital (SD) memory card is first inserted into a port, Windows Vista checks to see if its performance is fast enough to work with Windows ReadyBoost. If so, you are asked if you want to use this device to speed up system performance. You can choose to allocate part of a USB drive's memory to speed up performance and use the remainder to store files.The capacity of the removable media must be at least 256 MBDevices larger than 4GB will have only 4GB used for ReadyBoostThe device should have an access time of 1ms or lessThe device must be capable of 2.5 MB/s read speeds for 4 kB random reads spread uniformly across the entire device and 1.75 MB/s write speeds for 512 kB random writes spread uniformly across the deviceThe device must have at least 235 MB of free spaceNTFS and FAT32 are supportedThe initial release of ReadyBoost supports only ONE device
How does the Ravmon Virus affects your PC?
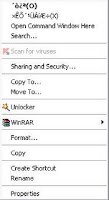 When you Open any drive in My Computer by right clicking, the Context menu will have a chinese like language & when you click on this language on context menu, the drive will not open but the Open With dialouge will ask you to “Choose the program you want to use to open this file:”. Also by double clicking any drive same thing happens.Context Menu and OpenWith Dialogue will look like this.
 The Ravmon virus does also corrupt your Folder Options. So when you open Folder Options and try to check “Show hidden files and folders” and click ok. My Computer will not show hidden files, also “Hide protected operating system files (Recommended)” option will not be working.Folder Options Dailogue
Error launching Task Manager, Registry Editor and Command prompt which is also solved by this tool
How Does the Ravmon Virus Spread?Ravmon Virus mostly spreads from USB Flash drives. So to prevent this virus from breaking into your pc you must start an Anti-Virus before plugining a Flash drive into your pc.For Removing Ravmon virus and its effects I have created a tool. Just download it, run it and Restart your computer.
Download Ravmon Removal.exe http://www.technize.com/?dl_id=6
Remove RavMon.exe virus without any anti-virus
you will have to follow just few simple steps.
check if ur infected
stop currently running virus
delete virus files
remove virus to run from startup
so here are the following steps explained
remember until you delete the virus files please open drives using address bar by typing C:\ D:\ X:\ as the virus is activated if you double click the drive
1. Right click any drive on your computer and see if right click menu shows some invalild characters
like this
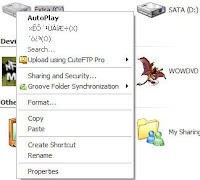 If yes then you are infected.
2. Press Alt+Ctrl+Del to bring up the task manager (or right click taskbar to run it)
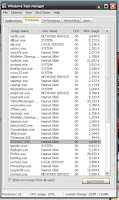 there will be a program in processes named “SVCHOST.EXE” there will be few svchost in small case but check one in capital letters, if you see more than one “SVCHOST.EXE” (all caps one) end the one with your username infront of it instead of LOCAL SERVICE, NETWORK SERVICE or SYSTEM.
by pressing end process
3. to delete the virus files you need to show system protected files.
for this goto
My Computer->(Menu) Tools-> Folder Options -> (Tab) View -> uncheck “Hide System protected files” -> press OK
If you are unable to unhide the system files you can use 3rd party softwares to browse drive and delete files, try ACDsee or WinRAR
Now open drive (by typing drive letter in address bar)
delete these 2 files
Autorun.inf
Ravmon.exe
also delete those in all drives (not CD(WR) or DVD(WR) drives) (and remember don’t double click else you will have to start over from top)
Open Windows folder and delete SVCHOST.EXE, SVCHOST.dll and MDM.EXE
Now restart the explorer.exe process by killing it in taskmanager and runing it again [(winkey + R), type "explorer" and hit enter]
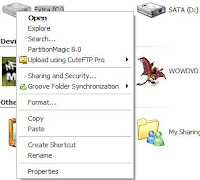 now right click the drive letter and ull see a clean menu
congrats virus is removed
4. Now remove it from startup (Optional as files are deleted)
Winkey + R type “msconfig” hit enter
goto startup tab-> (uncheck) MDM -> OK -> Exit without Restart How to prevent from this virus in feature
just right click any USB drive (that includes iPod) you have plugged into your PC
if they have currpoted menu the drive is infected
Access drive by typing drive letter and delete files from that drive
Remember you double click the curropted drive you get infected else ur safe
How To Repair Windows ???
Click start > run > type in "sfc /scannow" (without the quotes) then OK
This does a System File Check. If the scan finds any files that are corrupt or missing, it will prompt you to insert your XP CD. **Note the space in between sfc and /scannow.**
The scan can take quite a while so be patient. When the scan is finished, you'll be prompted to reboot and hopefully the problem will be solved. If the problem still exists, I'd try a Repair Install.
1. With the XP CD installed, turn on your computer.
2. You should see a prompt to "Press Any Key to Boot From CD"
(If you don't see this prompt you might have to modify your BIOS so the computer boots from CD.)
3. After pressing any key (usually the space bar) Info is loaded from the CD onto the hard drive. Eventually you will see a "Welcome To Setup" screen with three choices. Press enter to choose setting up Windows XP. DO NOT PRESS *R* TO SELECT "REPAIRING XP WITH RECOVERY CONSOLE"!!!
4. Press F8 to accept the licensing agreement. You should now see a screen that says, "If one of the following Windows XP installations is damaged, Setup can try to repair it." You should also see the drive (usually C:) on which the XP is installed.
5. With the drive selected (highlighted), now press "R" to begin the repair.
6. Again, be patient. The repair could take a while. Eventually, you will see a prompt to "Press Any Key". DO NOT PRESS ANY KEYS AT THIS POINT!!!! If you press any key, the computer will reboot from the CD. You don't want that. Let the computer reboot from the hard drive. Just give it a minute or two and it will reboot by itself.
7. Depending on how extensive the damage is, the repair process could end, or more than likely, it will continue and prompt you along the way.
8. Once again, you will get a prompt to "press any key" and once again, DO NOT PRESS ANY KEY. When the computer reboots this final time, you should be at the desktop ready to go.
9. By doing a repair, you will need to go to Windows Update site to reinstall any patches, hotfixes, critical updates, etc. that came out AFTER your CD was manufactured.
Hope this helps.
Here's how check disk (CHKDSK) works...
CHKDSK [volume[[path]filename]]] [/F] [/V] [/R] [/X] [/I] [/C] [/L[:size]]
volume - Specifies the drive letter (followed by a colon), mount point, or volume name.
filename - FAT/FAT32 only: Specifies the files to check for fragmentation.
/F - Fixes errors on the disk.
/V - On FAT/FAT32: Displays the full path and name of every file on the disk. On NTFS: Displays cleanup messages if any.
/R - Locates bad sectors and recovers readable information(implies /F).
/L:size - NTFS only: Changes the log file size to the specified number of kilobytes. If size is not specified, displays current size.
/X - Forces the volume to dismount first if necessary.
All opened handles to the volume would then be invalid (implies /F).
/I - NTFS only: Performs a less vigorous check of index entries.
/C - NTFS only: Skips checking of cycles within the folder structure.
In your case this is the command you would type.
CHKDSK /F /R /I
Note: Use /I parameter only if you're using NTFS.
This command will run a thorough scan on your hard disk sectors and will attempt to recover any corrupted files. It will also fix bad sectors.
If this does not work, then popin the CD and repair XP using the alternate method (not the Recovery Console)... To do this, instead of going to the recovery console, just simply follow the intructions.
If you need further assistance, just email me. sallumuji@gmail.com
Fixboot Writes a new boot sector.
Fixmbr Writes a new master boot record.
THIS IS DONE FOR XP BUT IF THE DISK WONT DO IT IN THE REPAIR CONSOL, HAVE A FRIEND MAKE YOU A SET OF BOOT DISKS. LOOK TO PC WORLD FOR MOR ANSWERS
your HDD died or your Xp died, re-install xp with complete format if that doesn´t work need a new HDD.
You may have to do a system applications restore.If you do this it Willl be like you just bought your PC.You will loose everything you have downloads.But you can reinstall it all also once you get through the recovery.When you turn on PC if you are able to see safe mode. windows log in, it will be a black screen start hitting f10 and it wil restore your windows xp application
Click start > run > type in "sfc /scannow" (without the quotes) then OK
This does a System File Check. If the scan finds any files that are corrupt or missing, it will prompt you to insert your XP CD. **Note the space in between sfc and /scannow.**
The scan can take quite a while so be patient. When the scan is finished, you'll be prompted to reboot and hopefully the problem will be solved. If the problem still exists, I'd try a Repair Install.
1. With the XP CD installed, turn on your computer.
2. You should see a prompt to "Press Any Key to Boot From CD"
(If you don't see this prompt you might have to modify your BIOS so the computer boots from CD.)
3. After pressing any key (usually the space bar) Info is loaded from the CD onto the hard drive. Eventually you will see a "Welcome To Setup" screen with three choices. Press enter to choose setting up Windows XP. DO NOT PRESS *R* TO SELECT "REPAIRING XP WITH RECOVERY CONSOLE"!!!
4. Press F8 to accept the licensing agreement. You should now see a screen that says, "If one of the following Windows XP installations is damaged, Setup can try to repair it." You should also see the drive (usually C:) on which the XP is installed.
5. With the drive selected (highlighted), now press "R" to begin the repair.
6. Again, be patient. The repair could take a while. Eventually, you will see a prompt to "Press Any Key". DO NOT PRESS ANY KEYS AT THIS POINT!!!! If you press any key, the computer will reboot from the CD. You don't want that. Let the computer reboot from the hard drive. Just give it a minute or two and it will reboot by itself.
7. Depending on how extensive the damage is, the repair process could end, or more than likely, it will continue and prompt you along the way.
8. Once again, you will get a prompt to "press any key" and once again, DO NOT PRESS ANY KEY. When the computer reboots this final time, you should be at the desktop ready to go.
9. By doing a repair, you will need to go to Windows Update site to reinstall any patches, hotfixes, critical updates, etc. that came out AFTER your CD was manufactured.
Hope this helps.
Doesn't sound very good. XP couldn't repair itself? To be safe I would go out and buy a new hard drive, install it as your master drive and reinstall xp. With your old drive as a slave or a secondary master and you may be able to get some of your files of it